Chapter 2
Design of Coupling Interfaces
2.1 General Coupling Description
In precision machine design, one of the most important steps in designing a machine is the consideration of the effect of interfaces between components. A badly designed interface can vary from costly difficulties such as additional control or calibration to machine failure when degrees of freedom are improperly constrained. In order to avoid these problems, engineers have developed a series of deterministic tools known collectively as kinematic couplings that allow for interface features to be designed to maximize performance. The boundaries of kinematic coupling applicability has been expanded in recent years to high load, industrial areas with the introduction of high load couplings using "canoe ball" couplings developed by Slocum (Slocum, 1992b) and quasi-kinematic couplings developed by Culpepper (Culpepper, 2000). These and other coupling flavors can be combined into a design menu, which allows the designers to select the proper coupling for a specific situation. Table 2.1 summarizes the major coupling types and their relative abilities. The following sections in this chapter will give a short description of each coupling type, as well as a overall description of the design process for the kinematic coupling and three pin coupling types. The chapter will end with a description of some of the major parameters that require consideration when employing any of these coupling types in high load, industrial settings.
2.2 Coupling Interface Types
When designing a coupling, the precision engineer can most easily distinguish the different coupling types by investigating the types of contact that occur between the coupled interfaces. The basic types of contact are surface, line, and point contact, in order of increasing repeatability.
2.2.1 Pin Joints and Elastic Averaging
The simplest coupling design consists of surface contact, which generally occurs with direct contact between large, relatively flat interface features. Because surface contact couplings have many possible contacts spread over the interface, deterministic design becomes difficult and repeatability depends mostly on flatness, finish, and other tolerances. Generally, direct interface contact can constrain only three degrees of freedom, which requires the incorporation of additional alignment features into the design for complete constraint of the six degrees of freedom. The most common alignment geometry are pins, due to low cost and easy implementation for non-precise applications; however, strict tolerances or compliant geometries are required to achieve a reasonable repeatability. Without compliance, pin joints can easily destroy parts when the alignment features jam or deform. Compliant geometries, such as dovetails, grooves, and rails, improve repeatability of an interface by enforcing geometric congruence through predictable elastic deflections and the removal of irregular surface features through wear-in.
In many industrial applications, preload to secure the joint is applied using bolts normal to the interface surfaces. Because of the frictional contact of the surfaces and the bolting load, surface contact couplings provide maximum stiffness and load capacity, which makes them suitable for most industrial applications where precision is not the crucial functional requirement.
2.2.2 Quasi-Kinematic Couplings
The next level of surface contact is the quasi-kinematic coupling, which consists of line contact situations such as a cylinder on a flat or a ball in a cone. By reducing a surface contact to a line, over constraint is reduced to only two degrees of freedom. Since line contacts only weakly overconstrain an interface, more deterministic relationships can be formed to provide improved repeatability. In industrial settings, line contacts do not appear as often as surface contacts, but the optics industry has made use of line contacts for aligning lenses in cylindrical capsules in v-grooves. Recent work by Culpepper (Culpepper, 2000) has developed a framework for designing and implementing quasi-kinematic couplings for high load, industrial environments, specifically in the assembly of an automobile engine.
Since quasi-kinematic couplings reduce the amount of surface interaction area, less useful area is available for the distribution of stress. Therefore, quasi-kinematic couplings can no longer support the highest loads with the best stiffness, but can provide improved precision with reasonable stiffness. Culpepper's design combines quasi-kinematic couplings using revolved line contacts with predetermined and predictable plastic and elastic deflections to optimize load capacity and stiffness, without sacrificing repeatability.
2.2.3 Planar or Directional Kinematic Coupling
The next coupling type, the planar or directional kinematic coupling, can be a combination of all three types of contact. For example, a planar coupling consists of a large surface contact area at the interface along with specially designed line or point contacts to constrain the free degrees of freedom. A directional coupling could be any type of coupling, which has precision alignment designed to repeatably constrain specific directions, while relying on surface features, tolerances, etc. in noncritical directions. The mixed contact coupling type has been formulated in this thesis as the three pin kinematic coupling, which uses a large surface area and three line contacts on three pins. Preload is applied by lightly torquing a bolt normal to one of the pins and more heavily torquing securing bolts normal to the interface. More details will be given for the three pin coupling later in this document.
Due to the mixed nature of these coupling, repeatability, load capacity, and stiffness are all a function of the individual design. Overall, planar kinematic couplings can provide high stiffness and load capacity with moderate repeatability.
2.2.4 Kinematic Couplings
The final coupling type, a fully kinematic coupling, represents the gold standard of couplings by using individual point contacts that each constrain a single degree of freedom. Because the interaction between the interface surfaces can be described by six distinct points, closed loop mathematics can be formulated to deterministically describe the relationship between the surfaces. In reality, point contacts must typically tolerate high loads, therefore the theoretical point contacts deform into Hertzian contact ellipses under large applied loads. The main limit to the repeatability of a kinematic coupling is the surface finish of the contact regions, while load capacity and stiffness are limited by the Hertzian contact stress.
By far, the most common form of the standard kinematic coupling is the ball- groove coupling, which interfaces three balls on one component to three grooves on the opposing component. The balls and grooves are placed on the three points of a planar equilateral triangle with the triangle sides coincident to lines passing through the contact points. The typical coupling structure is shown in Figure 2.2, while the standard coupling geometry terminology is shown in Figure 2.3.
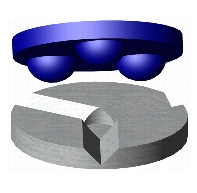
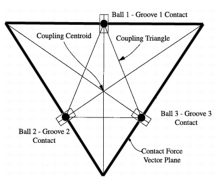
Figure 2.1 Three Ball - Three Groove Coupling Figure 2.2 Standard Coupling Geometry (Slocum, 1992a) 2.3 Design of Standard Kinematic Couplings
2.3.1 General Coupling Design Process
As mentioned above, the pure kinematic coupling can provide the most precise alignment interface. Much work has been published on the general design process of standard kinematic couplings. For a more detailed description of the design process, one should refer to the work of Slocum (Slocum, 1992b). Many years of work by Slocum and his students have produced a fairly standardized mathematical procedure for designing kinematic couplings. Originally formatted in a convenient Excel spreadsheet, the mathematics necessary to design a coupling were transferred to MathCAD and are included in Appendix A, with a few improvements such as off center loading. In the appendix, the basic process for coupling design begins by establishing the geometry of the coupling and the individual components. Each component is defined by a location on the main coupling circle, as well as a vector describing the normal of the interface surface at the theoretical contact point. In addition, the preload and disturbance forces must be specified so that the Hertzian contact stress and deformations at the ideal point contacts can be determined. Two quick checks for design success are to verify that the Hertzian stress stays less than the allowable contact stress and that the contact forces should not reverse direction. The position and force vectors are then assembled into matrices and combined with the Hertzian deformation to solve for the error motions of the coupling under the disturbance loading. Throughout the design, several other critical parameters like coupling stiffness, reaction forces at the points, and contact ellipse dimensions can be calculated.
2.3.2 Specific Design Considerations
Geometric Stability
In addition to the basic mechanics of the design, there are additional design considerations that must be addressed for a coupling to work. The first consideration, geometric stability, can be generally defined that a stable coupling is a coupling that will remain properly constrained under design loads. Stability requires specific attention for designs that stray from the ideal geometry of 120 degree spaced groove to groove angle. Figure 2.3 shows a 2D representation of different groove orientations and a relative statement of the coupling stability.
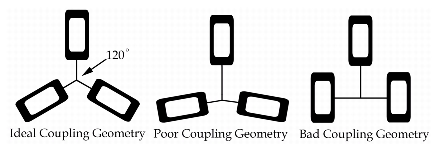
Figure 2.3 Coupling Geometry Stability
One of the most useful tools to analyze stability is the well known kinematics concept of instant centers, which is well described by Blanding in terms of proper constraint (Blanding, 1999). By determining the instant centers of two elements of a coupling, the third element can be located to provide maximum stiffness. The most stable coupling is one where each of the three instant centers is the same distance from the coupling centroid with the configuration as shown in the first schematic of Figure 2.3. This equal placement of constraints creates equal resistance to rotation at each instant center. If the coupling angles are changed as in the second schematic, the instant center of one element moves further from the coupling center than the other two instant centers. Increased distance between the instant center and the constraint introduces a longer moment arm about the coupling centroid for the constraint forces at the distant coupling element. The constraining moments about the other instant centers decrease, causing a non-symmetric stiffness in the coupling. If the angles keep increasing, stiffness in one direction can become negligible, causing instability to any disturbance force in that direction.
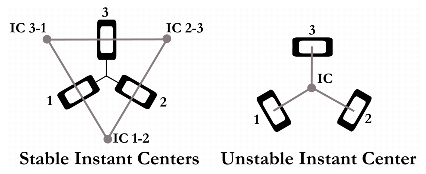
Figure 2.4 Instant Centers and Stability In Figure 2.4, two sample instant center schematics are shown. The first schematic indicates the 120° configuration above where the instant centers are located at a distance from each other to create maximize stability. The second schematic shows a configuration that could easily be mistaken to have stability as all six points are in contact in 120° form. However, an analysis of the instant centers shows that all three instant centers coincide at the center of the coupling triangle. Any disturbance force applied to this coupling will cause rotation about the instant center with very little resistance, as no constraint forces can be applied normal to the moment arm created from the constraint to instant center. For a design similar to the third schematic in Figure 2.3, the instant centers can occur at infinity, which allows for translation in the direction normal to the lines connecting the constraint and instant center. These two designs are inherently unstable, unless sufficient friction can be introduced at the interface to resist motion along the groove. While these couplings may represent bad designs for exact constraint of interfaces, differential stiffness and frictional constraints can be cautiously included in designs where these features may be desirable.
In addition to static stability, dynamic stability must also be considered in designs were high loads are applied in directions that change over time. In the first diagram, maximum dynamic stability occurs when the planes containing the contact force vectors intersect to form a equilateral triangle using similar logic as above. This configuration provides maximum resistance to a disturbance in any direction by properly providing a supporting surface. It can be easily seen in the second and third diagrams how a disturbance can easily cause motion in the coupling. When the design introduces dynamic loading or moving geometry, the coupling must also be checked for dynamic stability. Dynamic instability can be initiated when the forces at the interface contact points suddenly reverse or when the contact force vectors become aligned with the direction of the grooves. To prevent these dynamic instabilities, additional preload can be applied (within the allowable contact stress) and physical stops can be used to prevent improper motion.
Interface Stiffness
Integrally related to the stability of the coupling, stiffness can become a major influence on the applicability of a standard kinematic coupling to an industrial design. When the coupling components are arranged in the 120 degree configuration and the groove faces are perpendicular, the coupling provides equal stiffness in all directions. Change in the geometric parameters of any of the components will introduce changes in stiffness that must be considered if they are in sensitive directions. Since these couplings rely on six point contacts to support interface loads, stress and deformation levels can rapidly increase, causing a very undesirable change in stiffness properties when compared to a bolted joint. Changes in stiffness when using three ball - three groove couplings can amount to an order of magnitude or more reduction in stiffness. Careful comparison of finite element simulations of the original joint with approximations of the ball - groove interface are instructive for order of magnitude comparisons of the stiffness change. Since Hertzian effects at point contacts are not currently well modeled in commercially available FEA products, several approximations can be used to model the interface contact. The most accurate approximation relies on creating flexural geometries that simulate the joint stiffness predicted by traditional contact mechanics. However, careful attention must be paid to this approximation to ensure that all deflections and forces are compared at the proper locations. A less accurate method to simulate the contact is to replace the coupling geometry with a block enclosing the coupling elements. To simulate the change in stiffness of the joint, the material properties of the new block should be altered from the basic material of the structure to reflect the reduced stiffness of the coupling determined by contact theory. Appendix C contains the mathematics and further explanation of carrying out these approximations using the interface discussed in Chapter 4.
Contact Stress
Another item to be considered is the contact stress present at the interface. Due to the nature of the point contact, high Hertzian contact stresses can be present in the coupling under the preload alone. Stress analysis should be performed both concerning the static preload alone and with the maximum predicted disturbance force. In addition to the good practice of designing with an appropriate factor of safety, a ball-groove interface should be designed so that space of at least one diameter of the contact patch is left between the border of the Hertzian contact patch and the edge of the supporting components.
To counter the low load limitation present in traditional ball-groove couplings, Slocum has developed the specialized "canoe ball" element as described in U.S. patent number 5,711,647 (although not claimed). The canoe ball replaces the traditional hemispherical contacting element with a trapezoidal block with sections of a spherical surface ground onto the contacting surfaces. By grinding spheres with diameters as large as a meter onto the sides of the canoe ball, contact stress at the interface can be reduced while preserving the contacting components small size. The larger diameter creates an approximately kinematic elliptical contact patch that drastically increases the load capacity of a coupling while maintaining high repeatability. In Figure 2.5, the canoe ball is shown along with its matching groove. Benchtop level experiments have shown repeatability of approximately one micron for the design setup in Chapter 4 and 0.1 microns in previous work by Mullenheld. For a good presentation of contact mechanics theory, Johnson provides detailed derivations (Johnson, 1985).
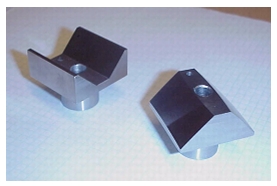
Figure 2.5 Canoe Ball and Groove Element Surface Material Properties
Of the many factors which affect the repeatability of a coupling, the choice of material for the ball and grooves has several critical influences. As in any precision design, one of the most important factors to consider is the friction between the contacting surfaces. Friction alters repeatability the most during initial assembly of the coupling. After each of the coupling elements touch, friction between the surfaces builds up and creates forces that impede the motion of the entire coupling from settling into its lowest energy state. Each subsequent replacement of the coupling will settle into a different position based on a complex relationship between the initial position of each contact point and the exact direction of applied force. Several techniques can be used to minimize the effect of friction, including low coefficient of friction materials such as Titanium Nitride combined with Tungsten Disulfide and proper dithering of friction. During installation, frictional effects can be easily dithered using a stepped bolting procedure and by simply tapping the interface region with a hammer. Dynamic couplings also require special attention to frictional effects to improve repeatability and response to motion.
Another important material influence on the repeatability stems from the relative hardnesses of the ball to the groove. Ideally, the best repeatability can be obtained by the combination of a hardened steel ball and groove. However, some designs may stipulate that one half of the coupling be disposable, while the opposing half must remain fixed to the rest of the structure. In these instances, it may be more useful to use hardened steel ball elements on the fixed structure and mild steel groove elements on the disposable components. This technique will help to prevent any assembly damage from being imparted on the fixed, more expensive structure and transfer the deformations to the grooves on the disposable structure. In addition, grooves can be easily milled into mild steel components using standard end mills rotated 45 degrees, while the hardened ball elements can be expensively machined or press fit into the fixed structure. When the ultimate level of precision is required, ceramics such as Silicon Nitride can be used for extreme hardness, as well as improved repeatability through decreased friction and wear-in time. During the initial assembly cycles of a single matched coupling, wear-in has been observed when coupling repeatability decreases slightly to a steady state value after many replacement cycles. This effect can occur due to the removal of surface finish aberrations by the loading and high contact stress at the point contact, as well as other interface interactions.
The final material effects involve three variations on surface geometry: surface finish, debris, and fretting. Out of the three variations, surface finish is the easiest parameter to affect during design, as the finish can be specified and measured during manufacturing. Furthermore, surfaces will tend to burnish or polish each other with increased time and load. Debris and fretting are more difficult parameters to analyze and remove, as these effects tend to develop over the lifetime of the components. In most cases, repeatability variation due to debris can be reduced by simply establishing a regular cleaning procedure to remove the debris using necessary solvents and by placing a small layer of grease on the elements. The final surface effect results from a process known as fretting corrosion. Fretting occurs between two surfaces of similar materials, particularly steels, when they are pressed together under large forces. On a small scale, these large forces cause surface asperities to crush together and atomically bond. When the surfaces are separated, the new bonds are ripped apart, causing the small pieces of the bonded materials to become debris on the surface. In addition, the process of ripping apart the material exposes new material to the environment. The newly exposed material can oxidize, causing a change in surface hardness as well as surface finish. Variation due to fretting cannot be easily avoided under high loads if non-stainless steels are used, so it is recommended that stainless materials, ceramics, or combinations of dissimilar materials be used. Ceramic and stainless materials also have the added benefit of being noncorrosive in many unpleasant industrial environments.
2.4 Three Pin Coupling
2.4.1 General Coupling Description
The three pin coupling developed for this work is categorized as a planar kinematic coupling, as contact occurs at three line or point constraints and a large surface contact. The name of this coupling is derived from the geometry of the interface, which consists of a plane contact constraining three degrees of freedom and three pins constraining motion in the plane. Each pin constrains motion by mating with a precision control surface normal to the interface plane. To prevent pins from jamming during assembly and to remove any free motion, preload is applied to an anvil pin using compliance or some adjustable mechanism. The proper design of the pin geometry and preload force will compel the coupling to deterministically seat in a repeatable position. The control surfaces and the pins are the only elements of the interface that require accurate tolerancing, as repeatability and exchangeability is affected by the location of each element. In Figure 2.6, the basic geometry and nomenclature for the three pin coupling is shown, while Figure 2.7 shows an example of one possible coupling structure. Since each pin interfaces with a flat or curvic surface, Hertzian contact theory can be used to describe the interface stress and deformation between the cylindrical pin or ground point contact and the control surface. A standardized spreadsheet or procedure similar to that available for standard kinematic couplings is not provided for the three pin coupling, as geometry can vary sufficiently to prevent a simple closed formulation. An example of the mathematics used to describe the three pin coupling used for the small scale case study are included in Appendix B, however these calculations are only useful for this particular design case. Johnson's contact mechanics book present a thorough coverage of any contact theory that may be necessary to further describe these interfaces.
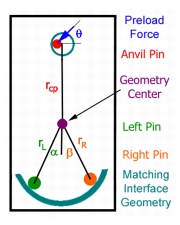
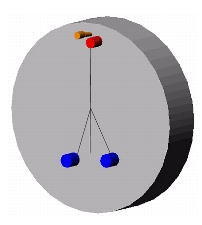
Figure 2.6 Nomenclature for Three Pin Coupling Figure 2.7 Basic Three Pin Structure 2.4.2 General Coupling Design Process
The basic coupling design process is a rather simple process, as it involves fairly standard summations of forces with regard to preloads, disturbances, and friction. In order to implement a three pin coupling, the following steps are required:
- Specify initial interface geometry, including locations for the support pins, anvil pin, control surfaces, and preload bolts. Determine method for applying preload and estimate static and disturbance loads. To reduce complexity of calculations, transfer external forces and moments to the location depicted as the geometry center in Figure 2.6.
- Construct a free body diagram based on initial geometry and the static load. Perform summation of forces and moments on this geometry to sustain static loading case. Solve for the minimum required in-plane preload necessary to ensure contact of the three pins with the control surfaces and for the minimum bolting force necessary to keep the planar surfaces in contact. Throughout the calculations, it is important to include friction from static loading (but not the bolting force) to ensure that the in-plane preload is sufficient to overcome the friction and seat the coupling with all possible initial positions of the coupling.
- Construct another free body diagram based on the initial geometry and the disturbance loads. Perform summation of forces and moments on the geometry to sustain the dynamic loading case. Solve for the minimum required normal preload necessary to ensure contact of the three pins with the control surfaces and for the minimum bolting force necessary to keep the planar surfaces in contact. Throughout these calculations, it is important to include the effect of in-plane friction as a function of the normal loading, as the in-plane friction will help to resist moments and torques in the coupling plane. Therefore, the bolting force must be increased to increase frictional resistance to any dynamic disturbances.
- Using contact forces at pins, check Hertz contact stresses, bending stresses, and any other failure modes of concern. Diameters and heights of the pins and the control surfaces can be determined based on these failure possibilities. Appropriate factors of safety should be applied to the in-plane preload, bolt forces, and stresses to ensure that the design will safely seat if estimated disturbance forces are exceeded.
2.4.3 Specific Design Considerations
Preload on Third Pin
Preload on the third pin can be applied in numerous ways, depending on the geometry and restrictions of the coupled components. In U.S. patent number 5,915,678, Slocum used a form of the three pin coupling called the kinematic sheet to align printed circuit boards for the electronics industry. Three pins were placed on a surface tilted with respect to vertical, while matching notches are placed in the kinematic sheet. Preload is applied to all three pins passively by using gravity to pull the sheet into place on the positioning plane. An illustration of this preload method excerpted from the patent is shown in Figure 2.8.
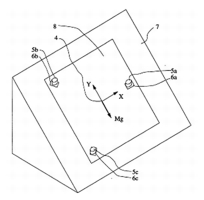
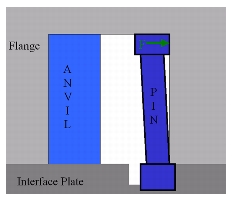
Figure 2.8 Kinematic Sheet Drawing Figure 2.9 Spring Pin Schematic
In Figure 2.9, another preload method is shown using a combination of a thick, rigid anvil pin and a relatively thin and compliant spring pin. The spring pin preload method ideally operates by simultaneously inserting the anvil and spring pin into the matching hole on the opposing component. By designing the matching hole to be smaller than the maximum distance between the outer surfaces of the pins, the pins will be compressed together. Since the spring pin is more compliant than the anvil pin, the compression force will cause the spring pin to bend following standard beam theory. Ideally, the anvil pin should not deflect at all and remain in kinematic contact with the matching control surface. Preload force for this design can be specified by determining the spring pin deflection from the basic geometric parameters of matching hole diameter, spring pin head diameter, spring pin main diameter, and distance between the spring pin base and anvil base. This spring pin deflection can be passed through standard beam equations to determine the force created from the pin insertion. A design example for this preload method will be shown in Chapter 3.
The final preload method considered employs a simple preload bolt, aligned so that its force is applied in the necessary direction for coupling constraint. This preload method is the simplest to implement, as it requires only a threaded hole in the proper direction. However, careful attention should be paid to the free body diagram and force directions to ensure that the coupling will seat in only one location. To ensure that overconstraint does not occur, a specialized bolt can be used with a copper tip to allow for some compliance at the contact point. Also, a simple wooden prototype can save much time verifying that the direction of the preload will properly seat the coupling.
Preload in Bolts
Preload applied using the bolts normal to the interface are very important to the successfulness of the three pin coupling under dynamic situations. To simplify calculations and improve precision, preload bolts should be located so that they pass through the centers of the pins. Often, the design will require that bolts be placed at separate locations or that more than three bolts will be needed to supply sufficient force. In this situations, the design must address bolt arrangement to prevent asymmetric bending of the interface plane. Bickford and Nassar have compiled a very useful handbook that can be helpful in properly designing the bolting configuration (Bickford, 1998).
Friction on Interface
Friction on the large contact surface provides the three pin coupling with additional ability to sustain large forces and moments in the plane of the coupling. To create interface friction, large normal forces must be applied to the surface using bolts. If the required bolting force exceeds the capability of the desired or possible bolting pattern, the friction coefficient of the interface surfaces must be increased by changing the interface material using coatings, by changing the quality of surface finish, or by including a dimpled friction plate between the interface surfaces. Any changes in frictional properties must be reviewed in the second step of the generalized design process to ensure that the in-plane preload is sufficient to seat the coupling.
2.5 Factory Issues
In addition to general design concerns for creating interface couplings, some helpful guidelines exist for the design of the assembly procedure. Often, these techniques can change the repeatability by an order of magnitude or more, but can be easily overlooked by installation and maintenance staff in a factory environment.
2.5.1 Lubrication of Interface
As mentioned earlier, the presence or lack of friction on interface surfaces can change functionality of a coupling. In the case of the ball and groove kinematic coupling, friction at the interface is an undesirable property, as it will tend to prevent the coupling from settling into the lowest possible energy state. The addition of lubrication to the surfaces after cleaning the surface can improve repeatability by a significant factor as less energy can be stored by the friction. Lubrication can be added using a swab of simple high pressure grease. However, spray lubricants are more desirable as the chance of contaminants being introduced to the interface is less in the spray lubricants than solid grease.
In the case of the three pin coupling, it is desirable that two separate frictional states occur: low friction on the edges of the pins and the control surfaces and higher friction at the interface plane. Similar reasons for low friction in the kinematic coupling exist for the in-plane elements, as friction will determine the initial location of each pin to control surface mating. Higher friction is desirable at this interface as friction at the interface increases the coupling's dynamic load capacity. Techniques such as dimpled friction plates and changing surface properties can be used to improve frictional properties. In situations where friction is a major cause of non-repeatability, dithering of friction can be employed by tapping the interface region with a hammer.
2.5.2 Installation of Bolts
In many non-precision applications, it may be sufficient, but not wise, to tighten bolts by hand and then give the torque bar a "good kick or pull" to tighten it as is often done in industrial settings. However, careful attention must be paid to the method used to install and torque the bolts when coupling precision components. Each time the components are coupled, new bolts should be used to prevent inaccurate preload caused by bolt stretch. In addition, both internal and external threads should be cleaned and lubricated before each use. Small contaminants or high friction present in the threads can cause jamming of the bolts or redirect the preload into breaking friction, rather than exerting a clamping force. When installing the bolts, the following sequencing should be used to optimally introduce the load:
- Clean and lubricate all threads.
- Insert all bolts into the components and lightly finger tighten without applying any torque.
- Torque each bolt to 10% of the final load to initialize contact at each interface. If multiple bolts are used, they should be torqued in a pattern where the following bolt is on the opposite side of the coupling. This pattern prevents the creation of an asymmetric bending moment across the interface caused by the tightening of several bolts on one side of the coupling. Each subsequent coupling should follow the same bolting pattern to ensure repeatability between couplings.
- Torque each bolt to 50% of the final load to counter the initial static friction. Torque pattern should be consistent with previous pattern.
- Torque each bolt to 100% of the final load to apply final clamping load. Torque pattern should be consistent with previous pattern.
2.5.3 Cleanliness
Cleanliness is always important in precision machines. In any type of couplings, contamination is important within the precision contact elements as it can change the location of the contact region, both through direct interference with the contact and through damage imparted on the surfaces. If damage occurs on the disposable component, minimal cost is incurred by replacing the component, while damage on the fixed structure can require replacement of a large part of the structure. Cleaning procedures as simple as a blast of compressed air to more complex freon cleanings can preserve parts and maintain repeatability for a low cost. However, cleaning procedures may remove the necessary layer of lubrication, allowing corrosion, fretting, or friction to disturb the design so lubrication must be repeated.